Monday, October 19, 2015

Ambition and a Two-Color Spiral Crochet

This past few days, I was having a hard time thinking of a new crochet project or a topic that I would want to blog about, so I thought to myself, "Hey, I need a business card!". Yes, I know. I'm being a little bit too ambitious, but this is where I want to head to eventually, so I want to be prepared.

Anyway, as I was making a draft for my business card, I realized that I needed a logo. I don't know why a turtle with a swirly back flashed in my mind, but as the saying goes, just go with the flow.

I made this two-color spiral after following the instructions here.


When I made this last night, I wanted it to be a turtle amigurumi or a snail applique but changed my mind after realizing that that would be the most obvious thing to do. My sister suggested that I use it to make a blanket. A blanket with swirls and circles. Another image flashed on my mind. Yes, I can definitely do that. I'm just going with the flow.

Tuesday, October 13, 2015

Simple Beaded Bracelet

I like keeping things simple, and that includes the accessories I wear. I created this Simple Beaded Bracelet because I wanted to learn how to incorporate beads with crochet without having to sew them on.

I'm not sure if a pattern already exists for this. I didn't use any reference for this one.


What you need:

  • mercerized cotton yarn, any color (I used navy blue)
  • 2.5 mm hook
  • beads, number depends on the size of wrist
  • tapestry needle
Stitches used (US terms):
  • chain (ch)
  • single crochet (sc)
  • half double crochet (hdc)
  • double crochet (dc)
  • slip stitch (sl st)
The pattern:

Step 1:

Make base chain. I made 80 ch. You can make it longer, depending on the size of your wrist. Close off.

Step 2:

Mark 20 ch on each end. This will serve as the string to tie the bracelet on your wrist. Again, you can choose to make it longer.

Step 3:

Insert beads on yarn.

Step 4:

Starting on first chain of the remaining 40 ch, sl st yarn with beads. Ch 1, [hdc, use one bead, ch 1 tightly on bead, dc, hdc, sc, sc] *. Repeat * until you reach the marker. Sl st on other side of the chain. Ch 1 and repeat * until you reach the other marker. Close off.

Step 5:

Use tapestry needle to hide trailing yarn.

Monday, October 12, 2015

Tutorial - Basic Tunisian Stitch

I've always been curious about the Tunisian crochet. I've seen it in almost all of the crochet books I bought, but never really tried learning it. My brush-off actually paid off, because as it turns out, you need a special hook to work on this stitch. Now that I have the hook needed to work on a Tunisian crochet, I guess I have no more excuse not to learn it.

So what is a Tunisian crochet? Tunisian crochet is a mixture of crochet and knitting, kind of like knitting without the actual knitting.

Basic Tunisian Stitch


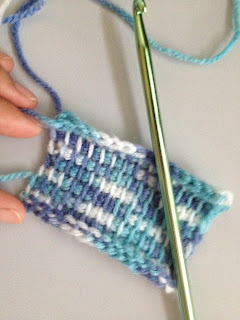
Before I show you how to make a basic Tunisian stitch, one important thing you have to remember is: work on the stitches loosely.

Step 1:

Make any length of chain. For my sample, I made 15 chains.

Step 2:

Insert hook on the second chain, yarn over hook and pull through the loop. Keep the loop on the hook. [Insert hook on next chain, yarn over hook and pull through, keep the loop on the hook] *.  Repeat * until the end. You should have the same number of loops on your hook as the length of your chain. Do not turn.


Step 3:

Working from left to right, yarn over hook and pull through first loop on the hook.


[Yarn over hook and pull through 2 loops on hook] *. Repeat * until the end of the row. You'll only have the working loop left on the hook. Do not turn.


Step 4:

Working from right to left, skipping the first vertical loop in front of the fabric, [insert hook (right to left, under) on the next vertical loop, yarn over hook and pull through, keeping loop on hook] *. Repeat * until the end.


You should have the same number of loops on your hook as the length of your chain. Do not turn.

Step 5:

Repeat step 3.

Step 6:

Repeat steps 4 to 5 to work on a row.


To "close" the Tunisian stitch, I slip stitched starting on the second vertical loop until the end.


A handy guide for Tunisian crochet can be found on this link.

Saturday, October 10, 2015

I Taught Myself Crochet Beginners Kit from Boye

MMy mother-in-law bought me this kit while they were in the US. The kit includes complete instructions for 16 projects (there's also a DVD that I have yet to watch), 5 hooks (3.75 mm - 6.5 mm), an Afghan hook (size I), tapestry yarn needles, stitch markers, and cabone rings.


Photo credit: Michaels


What I love about the kit:

  1. Afghan hook - What is an Afghan hook? An Afghan hook is a special hook that allows you to make an Afghan stitch (or Tunisian stitch). Okay, I admit that the first time I encountered the Tunisian stitch, I didn't know that there's a different hook for it. I only put two and two together after browsing through the book and reading an article about the above mentioned stitch. Insert facepalm emoticon here. From this alone, I already loved the kit.
  2. Detailed instructions - Because it's a beginners book, the instructions are really detailed. And the most amazing thing? There's a guide for lefties too. Most tutorials I see online are for right-handed people only. I'm not a lefty, but I appreciate the fact that they considered the lefties in this book.
  3. Projects - The difficulty of the projects included in the kit ranges from beginner to intermediate. You'll be able to work on more advanced patterns in no time.
  4. Stitch markers - Stitch markers are really handy, especially when working on rounds/rings. I also use stitch markers to hold the end loop when I pause for a break.
  5. Tapestry needles - Makes it easier to clean loose ends.
  6. Hooks in 5 sizes - It allows you to work on different gauges and yarn.
What I don't like about the kit:
  1. The instructions come in three languages: English, French, and Spanish. It takes too much space, space that they could have used for more projects. I think it would have been better if they just make the book available in other languages.
  2. They included cabone rings but did not include a project that will utilize it.

Friday, October 9, 2015

Simple Bracelet


This is a round bracelet, so make sure that the size is big enough to insert your hand through.

What you'll need:
  • Yarn - I used mercerized cotton, red and black
  • Hook - 0.8 mm or any smaller hooks
  • Needle - you can use a needle to make the zigzag design; I used a slip stitch when I made the bracelet because I didn't have one during that time

Stitches used on this pattern (US terms):
  • chain (ch)
  • double crochet (dc)
  • slip stitch (sl st)
  • backstitch (if using a needle)

The pattern:

Row 1: Make a chain to your desired length, sl st into the first chain.
Row 2: Make 2 ch, dc until you make a round; close round with an ss on top of the 2 ch's.

Repeat row 2 pattern until you got the desired thickness. Close off.

Sl st around the bracelet in a zigzag pattern.

Thursday, October 8, 2015

Chevron Bag


I consider this Chevron Bag as both a failed and a successful project. I'll write about that later, but first, the details on the pattern.

What you'll need:
  • Yarn (at least two colors) - I used three colors of mercerized cotton yarn (red, white, and black). In the video tutorial, a thicker cotton yarn was used.
  • Hook - Since I used a thinner thread, I picked a 4mm hook as my tool.
  • Scissors and needle - For switching colors and hiding tails.
Stitches used in this pattern:

  • chain (ch)
  • single crochet (sc)
  • double crochet (dc)
  • clusters of three dc's
  • joining 3 dc's into one
What you need to know about the pattern:

  • Make your base chain in multiples of 14 then add 2 more chains.
  • One cycle of the pattern consists of 3 dc on same stitch, dc, dc, dc, [join 3 dc over next 3 stitches] * 2, dc, dc, dc, 3 dc on same stitch.
  • Your rows should always start and end with a cluster. For row 2, make 2 dc's on third ch. Then at the start of each succeeding rows, ch 2 before making 2 dc's on third ch from the hook.

The video below is the tutorial I used to learn how to make the bag. I did not follow this tutorial to a tee. For one, I did not use the same type of yarn. I also made my base chain stitches longer since I was using a thinner yarn.


The back story

So as mentioned at the beginning of this post, I consider this project as both a failure and a successful one. The main objective of this project was to create a bag that I can use. I followed the steps (with some modifications) and voila, I made a bag! Mission accomplished. So why did I consider it as a failure?

When I started making this bag, I envisioned a big shoulder bag where I can put all of my bag essentials: my wallet, a pack of wet wipes, a comb, a hair tie, and my phone. But since I used a different thread and my base chain was relatively shorter, I created a smaller bag, that can only carry a coin purse, a small comb, and my phone.


Thursday, October 1, 2015

Little Owl Bookmark

I love reading, and a reader's best friend is - yes, you got that right - a bookmark. I created this cute bookmark for me and my book buddies.


I won't go into detail on the pattern, but here's a summary of what you'll need to make this bookmark:

  • at least 7 colors of yarn - for my bookmark, I used white, baby blue, dark blue, ecru, black, brown, and gradient green (I didn't have a solid green on hand)
  • hook - I used a 1.9 mm
  • needle - you will need to sew the eyes, leaves, and branch together
  • iron - yes, after you have assembled the parts, you need to iron it out
The 4 components of the bookmark before assembly.


The Little Owl Bookmark pattern can be downloaded for free on Ravelry, by Jelly Designs. Click here to download.